Showing posts with label sewing. Show all posts

Tuesday, October 13, 2015

Pink Ribbon Run Tutus

UntitledI don't know if I've ever mentioned this, but my husband is a runner and participates in basically every run in our area on a regular basis.  So there was never any doubt that he would take part in our local pink ribbon run to benefit breast cancer awareness and research.

It was also no surprise that my five-year-old daughter wanted to join in too by doing the 1 mile with her Daddy before he did the 10K.

My husband has been slowly introducing her to running with him on a small scale (he's even bought her special running shoes). So when she wanted to wear matching pink tutus to the pink ribbon run, my hubby agreed with one caveat, it has to be made of soft fabric!

 Pink ribbon run

 Apparently, tulle netting is scratchy and gives runners bush burn after a few miles.  So Noooooo,  I couldn't just make some quick, easy no-sew tutus.

Untitled

On a soft fabric mission, I headed to my local fabric shop for supplies and bought 6 yards of soft organza in two shades of pink, and while I was there I spotted this wide satin blanket binding with pink ribbons on it.  Yeah, it went home with me too :)  I serged the edges of the tutus and used the blanket binding at the waist to cover the elastic.

Untitled

Untitled
It took a bit longer to make them this way, but in the end it was totally worth it because they were not only comfortable but they can re-use them again next year.

Plus, I really enjoyed seeing my husband in a tutu. :)  Yeah, I'm mean like that.


In the end, a great time was had by all benefiting a great cause.


Friday, September 18, 2015

Gift Card Holder and Mug Rug

Welcome to the September HO, HO, Ho and On We Sew 
link party!

Let's face it my fellow holiday makers.  No matter how talented and crafty we all are, there will inevitably be someone on our holiday list who will get a gift card.  Personally, I love gift cards, and I have no problem giving or receiving them.  While they are great, they do lack that little handmade touch that many of us love to include in a gift.  So to remedy this situation, I will be sharing a fun, fast, and versatile gift card holder/mug rug pattern to kick off the September Linky party.

Christmas Gift Card Holder & Mug Rug sewing tutorial

Every month on the 18th, Paula at Mud, Pies, and pins and Fiona at Celtic Thistle Stitches will be hosting a link party where we can showcase our work and get inspired and motivated by each other to get going on our Christmas decor and gifts throughout the year. There is also a wonderful giveaway open to all linkers to the party.  You don't have to comment on this blog to be entered; you only need to link-up :)


Thank you to Plush Addict for sponsoring this months giveaway prize!  One lucky linky party winner gets their choice of one Skinny Dips bundle from Plush Addict. The bundles are a themed set of five fat 8ths of fabric.

Plush Addict Logo

xmas-skinny-fb


Christmas Gift Card Holder &

 Mug Rug Tutorial


Untitled

While many of the store bought gift card holders available are pretty, they are often for presentation sake only and will eventually find their way to the garbage can.  This is sad :(  

Personally, I like projects that are practical, pretty, and multi-functional.  This gift card holder is not just a pretty way to present your gift card, but it doubles as a Christmas ball shaped mug rug that the recipient can use at home or at work.  It's also designed to hang on the tree if you like to tuck a few little gifts into the branches of your Christmas tree like I do. Plus, it fits perfectly into an A6 sized envelope for easy mailing.   

variety

I'm also a big fan of variety, so this pattern includes a one fabric (basic) version, a paper pieced pineapple design, and a paper pieced log cabin as well.  


Supplies:
1/8 yard fabric or a variety of fabric scraps
batting
thread
1/8th inch ribbon for hanging
optional trim for embellishments

No matter which design you choose to make, you will start by printing the basic pattern and cutting out the shapes for the body (front and back for the basic pattern, only back if patchwork), the pocket, and the cap.

pieces

Cut your ribbon to about 4.5 inches long and place it between your two cap pieces.  Sew around the perimeter using 1/4 inch seam allowance (included in pattern) leaving the bottom open.  Notch the curve and flip right side out.

Untitled

Fold the pocket piece at the top along the fold line and press down.  Stitch it in place for a nice clean top.

Untitled

The cap, pocket, and back piece are made the same no matter which design you choose.  If you want to do either the pineapple or log cabin fronts, you will need your printout and a basic knowledge of paper piecing.

There are a zillion good tutorials out there on how to paper piece if you need one.  My personal favorite is this video provided by connecting threads.

The log cabin is the faster and easier patchwork front.

Untitled

The pineapple patch is also very pretty, but more time consuming than the log cabin.  It also lends itself very well to showing off a special fussy cut center.


Untitled

If you just want to wing the front patchwork, you could easily just piece random strips together

Untitled

or, you could go crazy and sew pieces around a central fussy cut motif.  The possibilities are really endless. . .

Untitled

Place the font body piece (either patchwork or plain) right side up on the batting.  Quilt the top using whatever design you prefer, and then trim off the excess batting.

Untitled

If you want to add any trim to the front, now would be the time to sew it down.

Untitled

Stack the front and back pieces right sides together with the pocket and cap in-between as shown.  

Untitled

Sew around the perimeter using 1/4 inch seam allowance.  Leave a minimum half inch gap un-sewn in order to flip it right-side-out (place the opening between the pocket and the cap in order to making closing it easier later). 

Untitled

Notch around the circle and then invert the body.

Untitled

Working from the inside with a tool or your fingers, shape the edges until your circle is fairly symmetrical. Pin and  sew your opening closed either by hand or machine.

Untitled

Lastly, you'll want to stitch around the perimeter again using a 1/4 inch seam allowance.  This will help keep all the layers together and make the pocket more secure.

Untitled

Now your ready to place your gift card in your holder . . .

Untitled

and send it out into a world full of beverages . . .

Untitled

that are waiting for mug rugs :)

Untitled


Now it's time for you to link up and show us all what you've been up to this month!  Plus, you'll get a chance to win the Skinny Dips bundle from Plush Addict.


I can't wait to see all of your  holiday creations and, as always, a big thank you to all of our lovely giveaway sponsors.


Crafty Trimmings
http://www.patchworkelephant.com/

Logo Sew Hot

Plush Addict Logo


Quilting Fabric at the Fat Quarter Shop

Monday, May 18, 2015

Christmas Mice tutorial

Welcome to the May HO, HO, Ho and On We Sew link party!

This is my second year participating in the Ho, ho, ho link party and I'm thrilled to be this month's host with a fun little Christmas Mouse Ornament pattern.

Christmas Mice sewing tutorial

Every month on the 18th, Paula at Mud, Pies, and pins and Fiona at Celtic Thistle Stitches will be hosting a link party where we can showcase our work and get inspired and motivated by each other to get going on our Christmas decor and gifts throughout the year. There is also a wonderful giveaway for entering the linky party.


This month's prize was kindly provided by the wonderful Katie of Japan Crafts.


Katie has donated this lovely Mini Rice Bag Kit for one lucky winner, it is just perfect for gift wrapping something special.

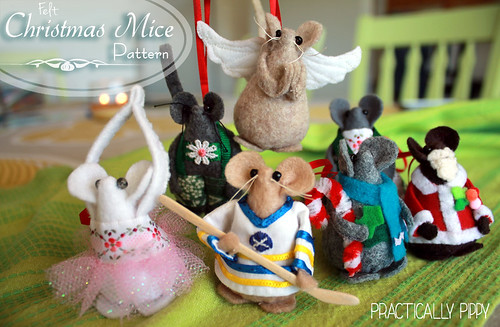
This month I'm happy to share a Felt Christmas Mouse Ornament tutorial with you.  These little mice are super easy and fun to make and personalize.  This is one of the projects that my mother used to teach me how to sew, and  I remember spending hours making and dressing my mice using any left over fabric scraps and bits of haberdashery I could find.

IMG_8477

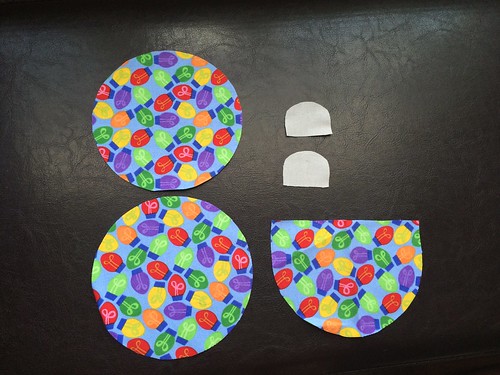
To make these mice you will need:
Printed pattern sheet
Felt in any desired mouse color
Stuffing
Thread
Glue (optional)
Black beads in size 6/0 or similar
1/8th inch ribbon for hanging
scraps of fabric, ribbon, buttons, etc for decorating your mouse

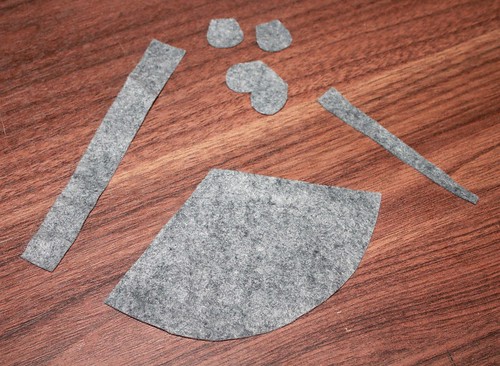
No matter how you dress your mouse, they each start with the same basic felt body.  Download the pattern here and print it out without scaling.  Using the pattern, cut each piece out of your felt.

IMG_8419

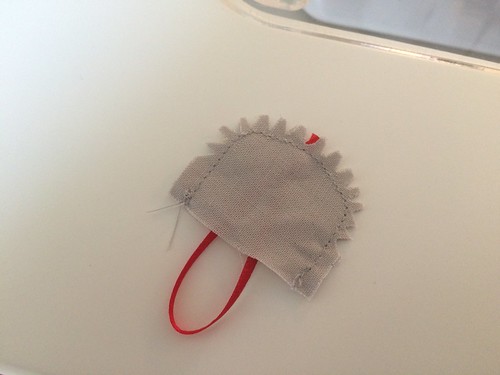
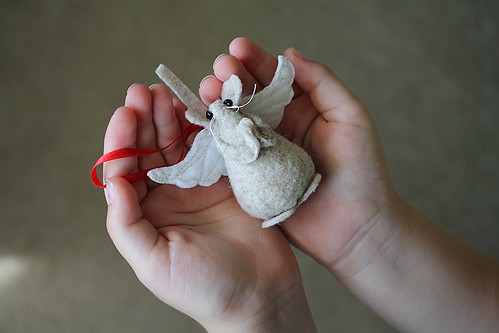
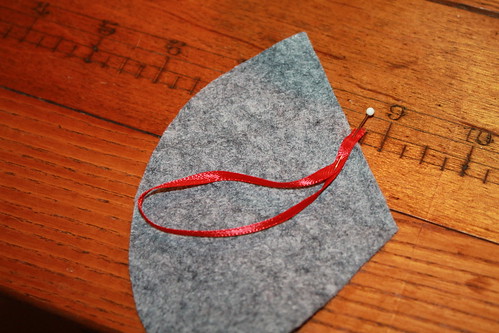
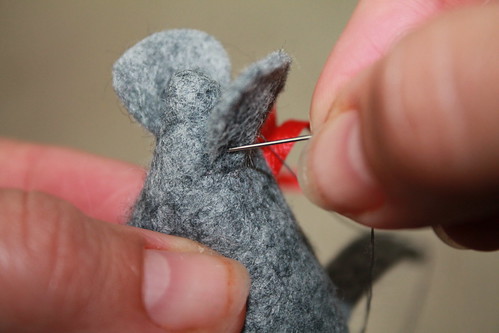
If you will be using your mouse as an ornament, you will need to cut a 7 inch piece of ribbon out now and pin it to your mouse on the dot as shown.  Make sure to put the ribbon on the inside of your mouse so that it will be on the outside when you flip your mouse right-side-out.

IMG_8430

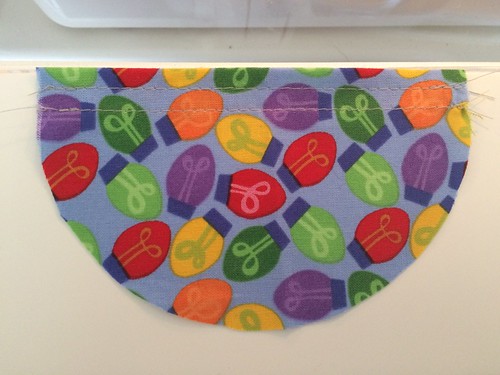
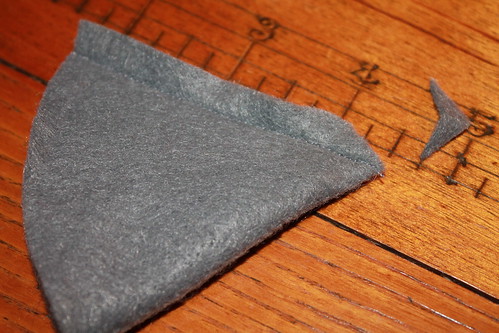
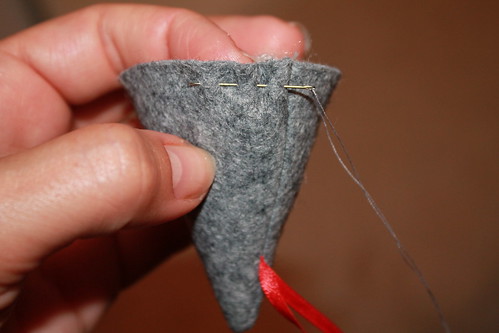
While you can easily sew each mouse by hand or even glue them together, I use my sewing machine to put together the main part of the body and the arms.  Fold the edges of the body together and sew them using a 1/4 inch seam allowance.

IMG_8397

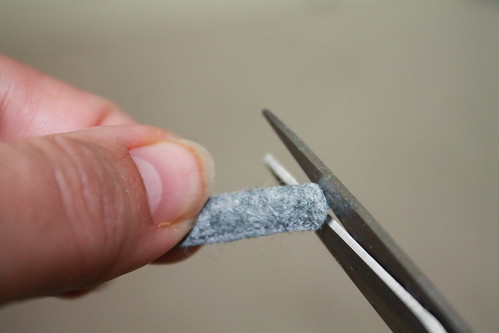
Cut the excess fabric off the tip of your mouse body before flipping it right-side-out so that you will not have to fight with this bulk later.  Flip your mouse body right-side-out and use a pointy tool to help shape the tip of the mouse.

IMG_8453

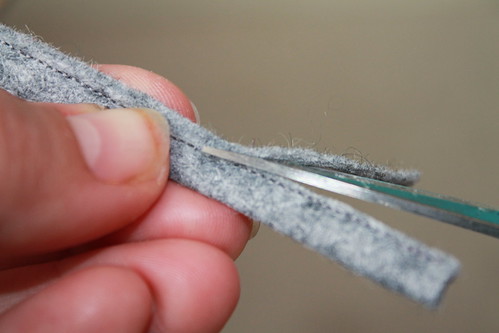
While you're still at your sewing machine, fold the arm piece together along the dotted line and sew the raw edges down using a narrow 1/8th inch seam allowance.  You will then need to carefully trim away the excess fabric above the stitches so that the arm wont be so bulky.

IMG_8433

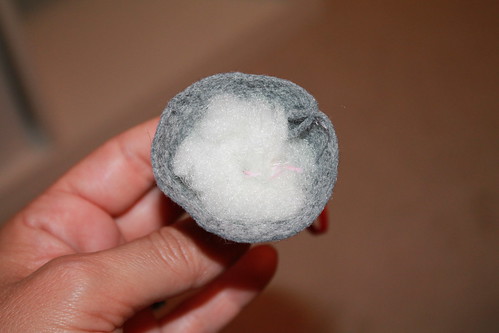
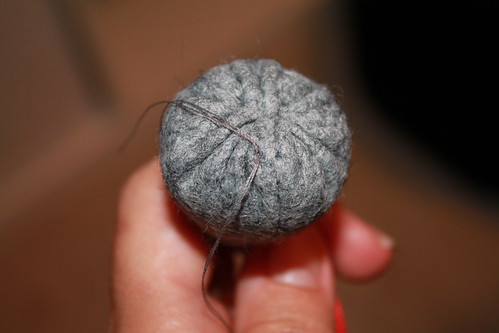
Set the arm aside for now and fill your mouse firmly with stuffing to about a 1/4 inch from the top.

IMG_8434

To close your mouse you will need to run a gathering stitch all the way around the base using a DOUBLED UP length of thread. 

IMG_8435

Leave a long enough tail of thread on both ends so that you can use them to tightly pull your mouse body closed.  While you're pulling the bottom closed, tuck the seam allowance into the mouse with your finger or a pencil so that you end up with a flat bottom and secure it with a knot.

IMG_8441

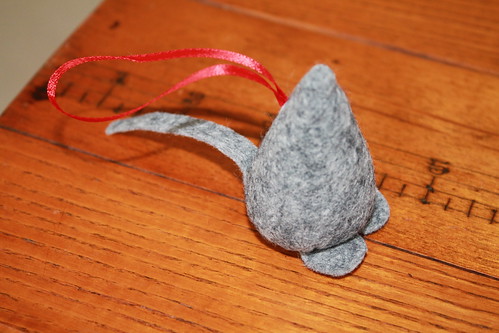
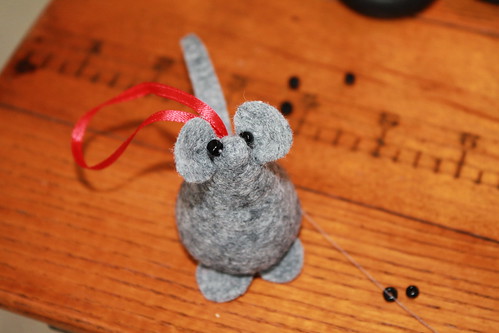
Position your mouse feet and tail as shown and either sew or glue them to the bottom of the body. 

IMG_8456

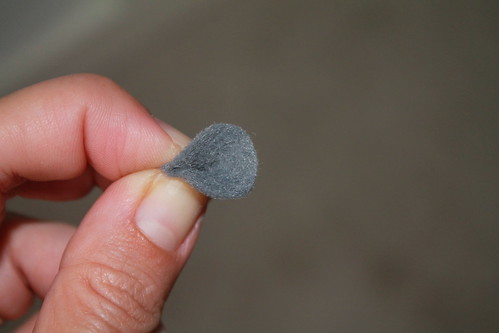
Pinch your mouse ear together along the dotted line and use a dot of glue or threat to secure the fold.

IMG_8443
 
Positioning the bottom of your ear about 1/2 down from the tip of the mouse, secure it in place with either thread or glue.


IMG_8447

Now it's finally time to sew or glue the beads on either side of the head above the ears for the eyes.  This is my favorite part because it is when the mouse really starts looking alive to me.  The next best part is putting on the arms.

You may be wondering at this point why the arms are going on last.  Wouldn't it make more sense to put them on earlier?  Well, if you are going to leave your mouse naked, you could do it before the ears and eyes. The problem is that how your mouse is dressed is going to effect how you place and secure down the arms.

IMG_8455

The arms can be the most expressive part of your mouse and how you position them is going to be a huge part of who your mouse is.  No matter how you bend the arms, I like to round off the tips to give the appearance of hands.

Mouse back

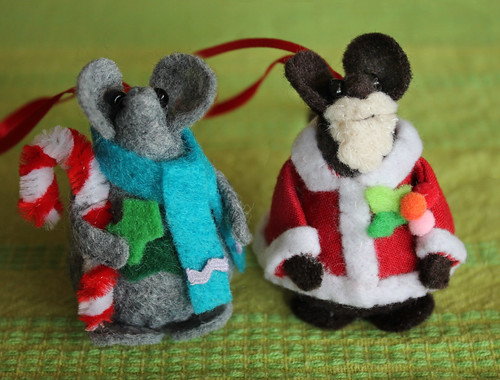
The winter mouse above is a good example of how I normally place the arms by wrapping them around the upper body.  You'll notice in the pattern that the arms seem extremely long.  This is so you'll have enough length to bend and shape your arms into place, and you can easily cut off any excess length.

IMG_8496

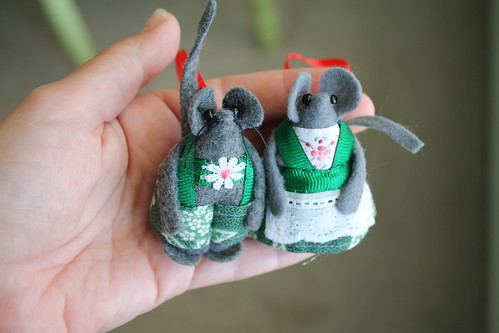
Both these German mice have arms that are wrapped around their bodies because her dirndl and his lederhosen don't interfere with that placement.  

Yeah, I had to make some German mice in honor of all the Christmas seasons I enjoyed in Germany :)

IMG_8471a

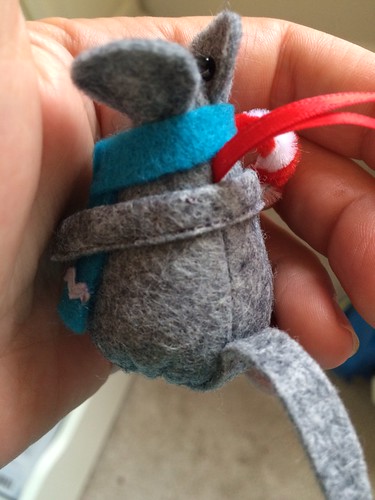
Adding a shirt or coat to your mouse, like with this Santa mouse, means that you will need to cut your arms in half and stuff them up the sleeves of the shirt.  Wrapping them around the back is not only bulky this way, it is nearly impossible to get a shirt on a mouse that has his arms already attached.

IMG_8467

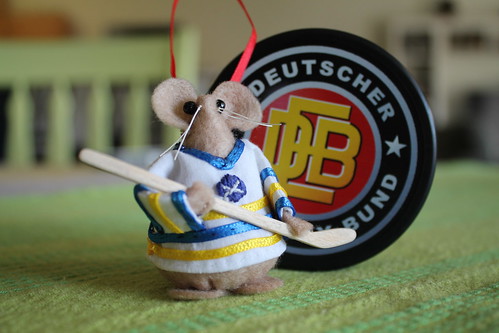
I really love this Buffalo Sabres hockey mouse because we are big fans in my house (and I have to admit that I loved whittling the hockey stick).  He was great fun to make and is a good example of how to take the basic shirt pattern (which is included) and customized it.  The shirt and coat patterns can easily become nurse scrubs or Santa coats.  

I'm not going to give a full tutorial on how to make the mouse clothes here, but I do want to say that the patterns included for the shirt and coat are meant to be stitched with a very narrow seam allowance of around an 1/8th inch.  Also, the length of the sleeves and coat are best finished by hand when the clothing is on the mouse and details like the V-neck worn by the hockey mouse are clipped once the basic shirt is on the mouse. 

IMG_8484

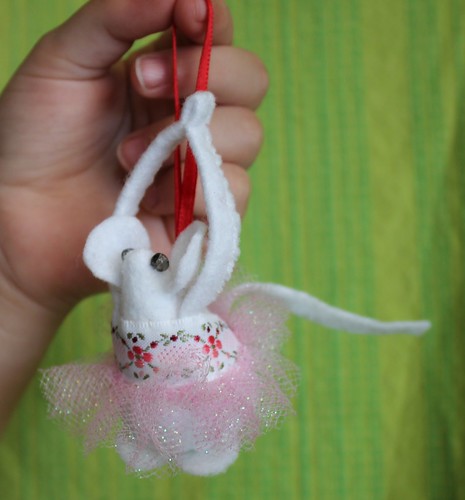
But, you don't need to spend time sewing mouse clothing to have a really great and fun mouse.  This ballet mouse looks great and is dressed with a piece of ribbon and some tulle. 

With a little imagination, you could really do anything with one of these mice and they make great gifts for friends and family.

Now it's time for you to link up and show us all what you've been up to this month!  Plus, you'll get a chance to win the mini rice bag kit from Japan Crafts!


I can't wait to see all of your  holiday creations and, as always, a big thank you to all of our lovely giveaway sponsors.


Crafty Trimmings
http://www.patchworkelephant.com/

Logo Sew Hot

Plush Addict Logo


Quilting Fabric at the Fat Quarter Shop
Related Posts Plugin for WordPress, Blogger...