Friday, February 21, 2014

February Sketch

Did you think that I forgot to share my sketch for this month???  While this may be a little late for Valentines day, I firmly believe that it's always the right time to tell someone that you love them or express how grateful you are to have someone in your life.  Right now, I want to thank the whole blog community for always being so wonderful and generous.

robot card blue wb


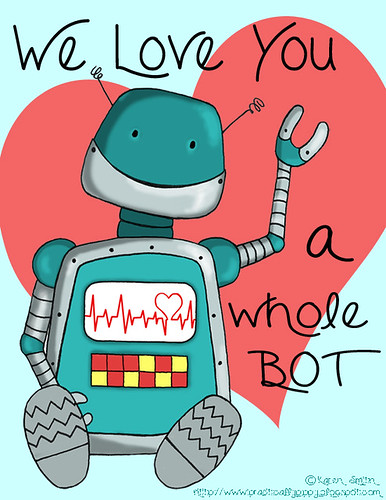
I hope that you like my little Robot buddy.  He's hand drawn and then colored on the computer in Adobe Photoshop Elements.  The font used for the message is called Forget me not and it can be downloaded for free personal use.

As always, I want to show you a bit of my process so that you see how a doodle can become an illustration.

IMG_8383

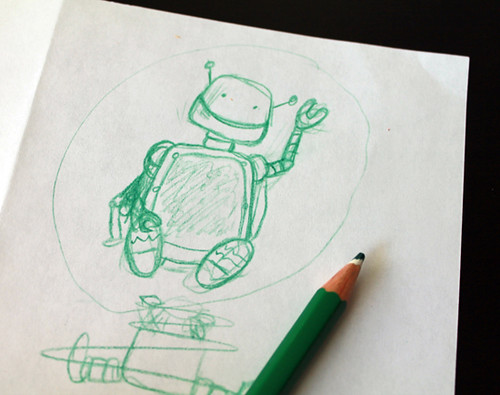
This was a doodle that I did on a scratch piece of paper.  I did a few different robots, but this was my favorite concept.

IMG_8387

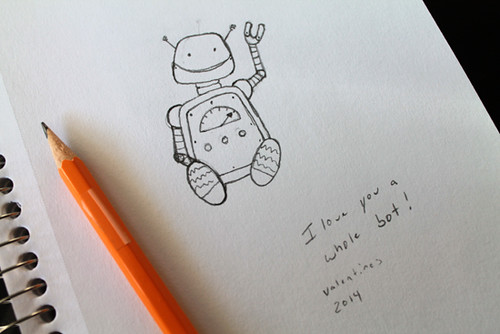
Here is where I redrew the doodle into my sketchbook so that I wouldn't loose it.  I also refined the idea a bit more.  You can see that I first thought about doing a gauge on his chest, but then I changed my mind when I was doing my final inked image.  

IMG_8419

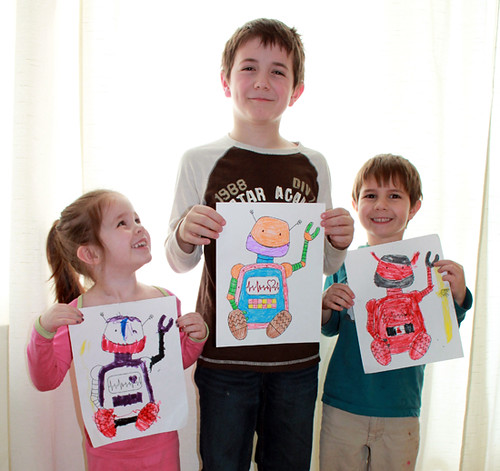
After scanning it, I decided on how I was going to color it with the help of my best buddies!  It has become a household tradition that each time I finish a new sketch, my kids get to color their own copy.  My middle son was a bit bummed that my robot didn't have a sword so he drew his own :)

You haven't seen the last of this sketch!  I have a plan for my little robot buddy; you will be seeing him again very soon.


Wednesday, February 19, 2014

100 days of school toy wreath

My poor blog is feeling a little neglected this month so I think that it's time to do an update on some of the projects that I've been doing.  I have a really fun blog post in the works that I want to get out, but it's still not quite ready. So, in the interim, I want to share another fun project that I just finished up with my six-year-old.

IMG_8333 
My middle child had to do a 100 days project at his school where he shared a collection of 100 things.  It could have been anything from 100 stickers to 100 toothpicks, but since we had just got done going through the kids' toys to weed out stuff that was going to get donated to our local thrift store, I figured that we could use a lot of those tiny toys to make his teacher a 100 days wreath.

I wrapped the wreath in black ribbon to give it a nice base before we began, and my son manned the toy bag and kept count while I wielded the hot glue gun.

IMG_8337

I think we managed to use every fast food, birthday party, broken, and seasonal toy in our house in order to get 100 toys to fit on the wreath.  I especially love the broken etch-a-sketch because the teacher can use a dry erase marker to write different messages on the wreath over the year.  I think that my son's favorite part was the warring army guys at the top.  

IMG_8321

I'm also quite pleased that everything on the wreath was reused from other projects.  The wreath form has been used in a few seasonal wreaths so far this year, the ribbon was left over from Halloween, and the toys were all from my kid's stash of tiny toys.  I do so like a project that makes me feel all thrifty.

Now that I've made this wreath for my son's teacher, I totally want one too!  It's a great way to transform cheap and old toys into something totally new and unique.  I could see it used for a birthday wreath or even a way to save and display special toys.
Related Posts Plugin for WordPress, Blogger...