

Don't be afraid! You can paint your curtains and have it look good without a crunchy finish.
Hello everyone. For those who read this blog, you know that we are a military family. Being a military family means that we move a lot, and many of the things that we use to decorate one house don't always work for another. Curtains in particular can be really problematic because window sizes vary so much from house to house, and sometimes I admit that I just want a change.
We just moved, and since I'm keeping the walls white downstairs this time, I really wanted grey striped curtains. But, at $70 a set, new curtains aren't really in the budget. Luckily I already had white curtains that I used for our last place and with a little paint they are great downstairs!
I was a little worried that painting stripes wouldn't work well. I wondered if they'd be stiff, if they would be colorfast, and if the paint would bleed under the tape. After a little trial and error, I found a really good combination of supplies and tools that put my curtain painting fears to bed.
Supplies:
Acrylic craft paint 8 oz. bottle
Textile Medium (8 oz. bottle Ceramcoat)
Foam roller
Clothing iron
Green Frog Tape (I tried blue and it bled through)
Directions:
1. Using the ratio on the bottle (my brand used 2 parts paint to 1 part textile medium) thoroughly mix your paint and textile medium together in a container. Since I did four curtain panels, I mixed five 8oz bottles of white acrylic paint and one 8oz bottle of black acrylic paint with three 8oz bottles of textile medium.
2. Iron and lay out your fabric on a flat protected surface. Measure the length and decide how many stripes you want. I wanted five painted stripes with the unpainted stripes on both the top and bottom, so I needed to divide my curtain into 11 equal sections. I used an 8.25 wide stripe for my curtain.
3. Since you see your curtain from the top down, it's important to measure and mark all your drapes from the top stripe to the bottom. This way if there is a slight variation in size from curtain to curtain your stripes will still be parallel. Make sure to take your time and mark a very straight line across your drapes.
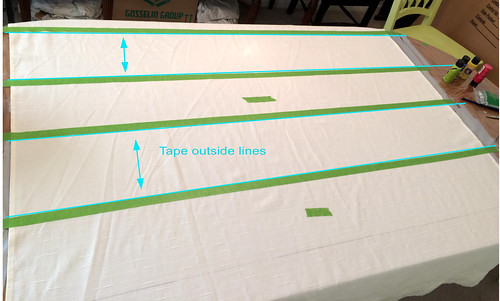
4. Once your lines are marked, you need to tape them using green frog tape. I tried blue tape and it didn't work well for this project. Mark the stripes that you are not going to paint with a little piece of tape in the middle so you don't get confused, and then tape on the outside edge of the lines on the stripe that you ARE painting. You know you've done this step correctly if the stripe you are going to paint looks bigger than the one you are not going to paint. Really rub your tape into the fabric to ensure a tight seal.
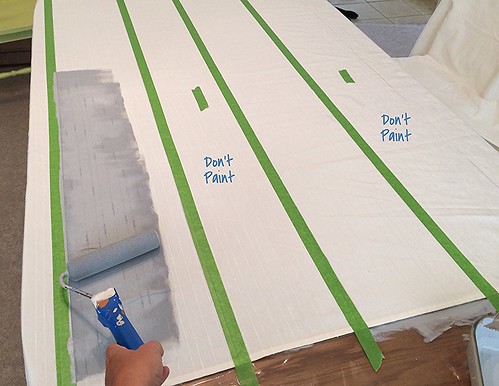
5. Using a foam roller paint the first coat on your stripes. When you are painting the edges of the stripe make sure to use lengthwise strokes parallel to the tape with only a slight overlap. Let the paint dry without moving the drape from your painting surface and then give it a second coat.
6. Once the panels are dry you can remove the tape. At this point, the paint will be somewhat stiff. If you don't mind this than you can iron and hang your curtains now and be done. If you do want a softer look and feel though, you are going to have to iron your curtains and then wash them.
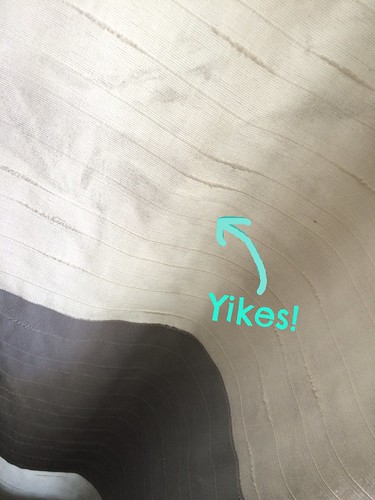
The problem with this is that (depending on your textile medium) curing time can be around 8 days. On my test curtain, I decided to throw caution to the wind and iron my curtain after only 24 hours and then throw it into the wash. Yeah, not a good idea. I had some paint transfer. After a second wash, the transfer went away, but I then decided to follow the manufactures instructions for the rest of the panels.
7. With a hot iron (set at a temperature appropriate for your fabric) thoroughly iron your stripes and let them cool. Wash them in cold water with very little detergent and then dry them (note: if you didn't pre-wash to prevent shrinking you might want to be careful here and not dry them in the clothes dryer).
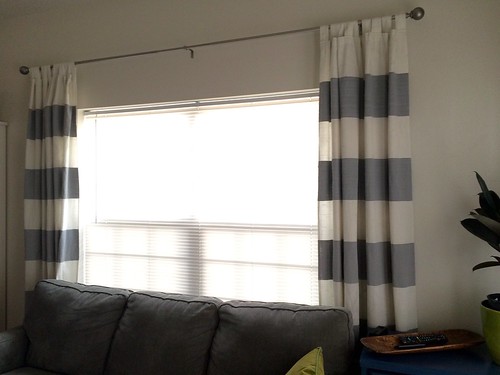
Now all you need to do is hang your curtains and enjoy! I loved how mine turned out and I hope that this tutorial helps anyone who's on the fence about painting their curtains to give it a go too.
Your curtains look great, you've done a wonderful job. I hope you are enjoying ypur new home :)
ReplyDelete