Showing posts with label wreath. Show all posts

Sunday, August 17, 2014

2 twisted wine cork wreaths

While I was in California last year visiting with my family, I got the chance to make my parents a really BIG wine cork wreath to hang over their living room fire place.  The space demanded a big wreath, so I made one using a pool noodle and larger child sized hula hoop as the wreath form.  I wanted a lot of movement in this wreath so instead of just stacking the corks symmetrically around the form, I twisted them around it.  I'm revisiting this project now because I just finished making a smaller version for my apartment door.  I love how both wreaths turned out and I have a few little tips to share with everyone that I learned along the way.

IMG_5107

Tip 1: Burlap

As you can see, I covered the form with wide burlap ribbon so that the corks would have something to grip onto when I hot glued them down.  The burlap is also the perfect color base for the wreath so your gaps don't show the pool noodle color (no one wants blue pool noodle poking out form under their cork).

IMG_4924

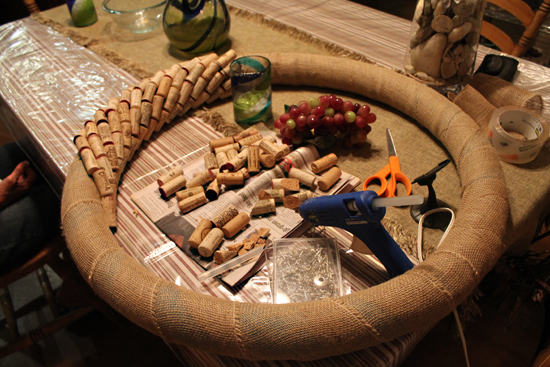
Tip 2: Sort your corks

The part that I found the most fun was choosing the individual corks to go on the wreath.  There are so many really cool ones out there to choose from; plus, I put a few special ones on the wreath too.  

IMG_5088

But, before you start gluing, sort out the small, long, and special corks.  As I put the corks around the wreath, I found that sometimes I needed a smaller or bigger one to make my row fit right.  I even had to cut a few corks down a bit to finish my row, but I always hid those ones at the back.
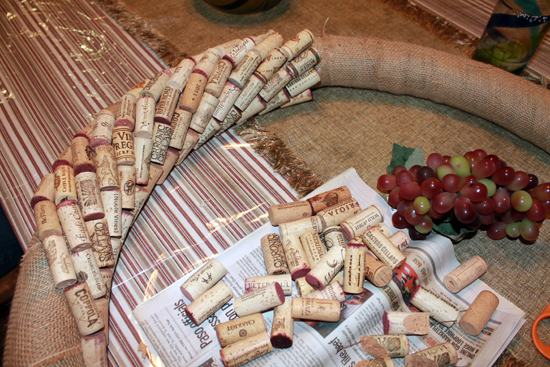
IMG_4927

Tip 3: Placement

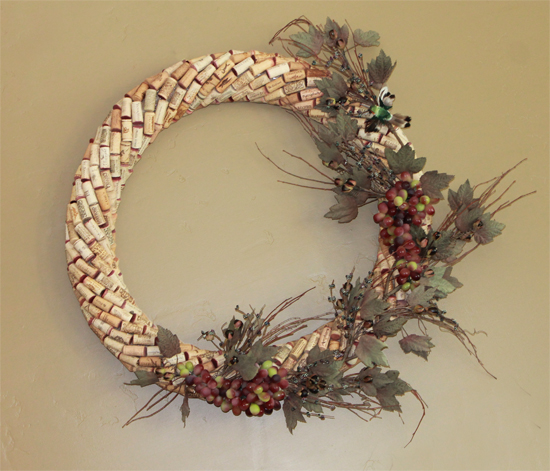
I did a lot of looking around the internet at different cork wreaths before I designed this one and I didn't see any that twisted the corks around like I did here, maybe it's because getting the placement right is hard.  If you're using a pool noodle like I did then I found that 6 corks per row was just perfect.  Once you get your first few rows in place it's important to make sure that you re-adjust  your corks as you go so the angle stays the same all the way around.  Because corks are not all uniform in size, it's easy to loose the angle.

IMG_5082

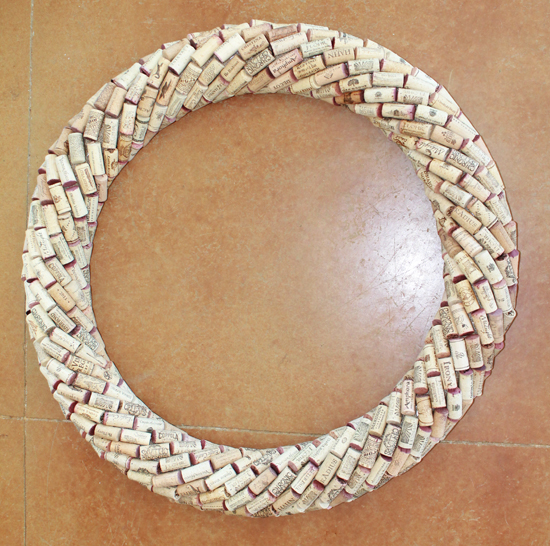
Tip 5:  Add a hanger before you glue the last few rows.

It took exactly 365 corks to cover this wreath, two bags of full sized glue sticks (not minis), and three days that involved wine and margaritas.  I blame the spot that got a bit wobbly on the margaritas :)  Just a note. This wreath turns out pretty heavy so make sure to use a sturdy length of wire to make a hanger before you add the last few rows of cork.  There is no good way to wrap a wire around the corks after you finish.


IMG_5110

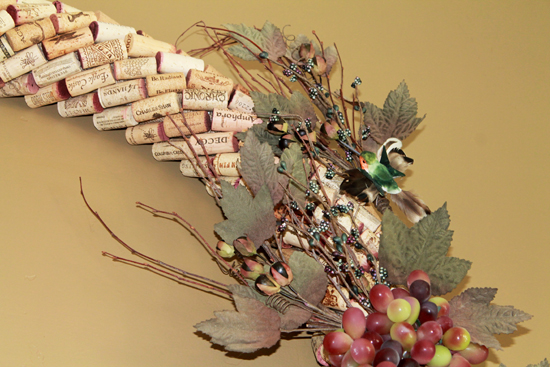
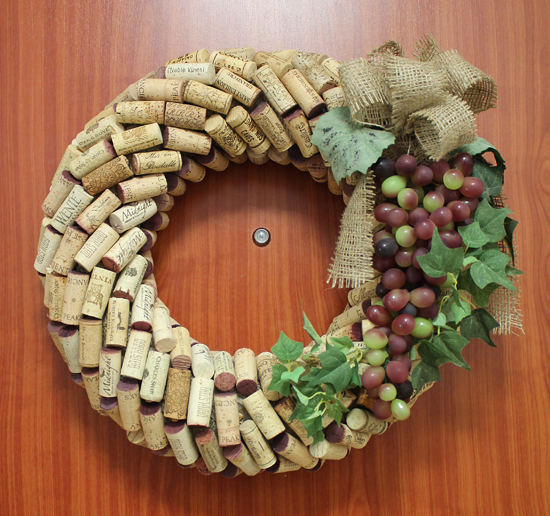
Tip 6: Support the weight at the top and bottom

Even though I loved this wreath plain, I wanted to add a few wine country touches with grapes, leaves, and even a humming bird.  I love the little hummer because my parents always have a zillion hanging around their feeders.  When we hung this wreath, we used a 25lb picture frame hanger at the top, but also supported the weight of the wreath with a nail at the bottom to keep the wreath from sagging.  The bottom just sits on a large nail secured into the stud.  

IMG_7332

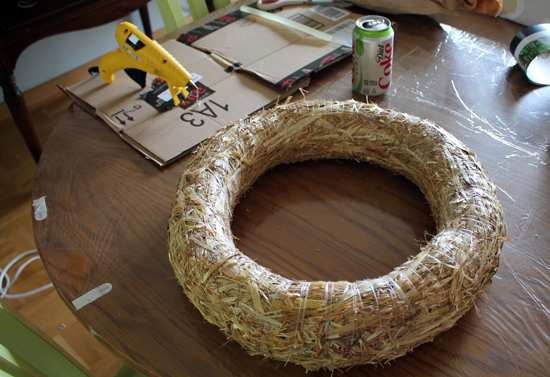
Tip 7: Choose a very even form

When I made the smaller version of this wreath for my front door, I only supported it from the top, but I used a lot of the same construction tips from the big wreath.  I only wish that I hadn't used a straw form because it is not uniform enough all the way around to keep the corks from getting off track.  I should have made another pool noodle form or bough a foam form so that I didn't have to deal with the the wobbles in the straw.

IMG_7349

I love how the door version turned out too, and I'm happy to have a nice wreath to celebrate the end of summer for my door.  I hope that my tips can help you make your own wreath to decorate your home.

How everyone else is celebrating the last part of summer?  Any special trips, activities, or projects planned?  

Wednesday, February 19, 2014

100 days of school toy wreath

My poor blog is feeling a little neglected this month so I think that it's time to do an update on some of the projects that I've been doing.  I have a really fun blog post in the works that I want to get out, but it's still not quite ready. So, in the interim, I want to share another fun project that I just finished up with my six-year-old.

IMG_8333 
My middle child had to do a 100 days project at his school where he shared a collection of 100 things.  It could have been anything from 100 stickers to 100 toothpicks, but since we had just got done going through the kids' toys to weed out stuff that was going to get donated to our local thrift store, I figured that we could use a lot of those tiny toys to make his teacher a 100 days wreath.

I wrapped the wreath in black ribbon to give it a nice base before we began, and my son manned the toy bag and kept count while I wielded the hot glue gun.

IMG_8337

I think we managed to use every fast food, birthday party, broken, and seasonal toy in our house in order to get 100 toys to fit on the wreath.  I especially love the broken etch-a-sketch because the teacher can use a dry erase marker to write different messages on the wreath over the year.  I think that my son's favorite part was the warring army guys at the top.  

IMG_8321

I'm also quite pleased that everything on the wreath was reused from other projects.  The wreath form has been used in a few seasonal wreaths so far this year, the ribbon was left over from Halloween, and the toys were all from my kid's stash of tiny toys.  I do so like a project that makes me feel all thrifty.

Now that I've made this wreath for my son's teacher, I totally want one too!  It's a great way to transform cheap and old toys into something totally new and unique.  I could see it used for a birthday wreath or even a way to save and display special toys.

Friday, November 1, 2013

Last Minute Halloween

This years Halloween was a bit more last minute than usual.  If I'm honest, many of my projects are done in a hurry between taking care of the kids, the house, and my own school work.  This year was a bit more last minute than in years past because my husband has been gone these last few months and I'm trying to do everything myself.  But, I still managed to crank out some costumes for the kiddos and a last minute Halloween Wreath.

hw1

I was actually going to skip the Halloween wreath this year, but my oldest son was not pleased with this idea.  So, I whipped this wreath up using the cheese cloth that I used to cover the couches at my Halloween Bunco Party, and added a spider that I found laying around the house.  Fast, easy, and my son was happy.  All good things.

I was also running a bit behind with costumes, but between reworking old clothes, thrift store finds, and some new accessories I managed to outfit the whole Boo Crew with their desired costumes.

hw2

This year, they all wanted to be monsters or witches.  I can't believe that I actually got these all done in time!  I really loved doing the witch costume with my little girl.  She just adored the tulle tutu and the feather witch hat, but I have to admit that I really really love my little son's skeleton costume.  My oldest was the easiest.  He decided that he wanted to be a zombie, and thank goodness his idea of a zombie resembles the old black and white movie versions and not some of the newer zombie movies from today.  I'm not ready for any kind of gory costumes yet.

hw3

I love how the costumes turned out and I love that the kids were the ones who told me what they wanted this year.  I'm putting this Halloween in the win pile and looking forward to the next holiday.


Sunday, September 29, 2013

Fall Flowers Wreath & tutorial

Hello to everybody out there who follows my blog or just stumbled onto this post.  Wow, it's been a long while since I made a new post!  I actually took an extended vacation back to the states with my children for the summer.  It was a great time, and I have SO much stuff to share with you all from my visit.  I wish I could have blogged during my trip, but no computer made it kinda hard.

We are now back home in Germany and the kids and I have started school again.  This semester I'm taking a statistics class.  I'm glad I like math :) But, I do hope to get plenty of blogging done this fall in order to catch you all up on some of my projects.

IMG_5494
If you know me at all, you know that I love to make seasonal wreaths.  Click here to see last year's Fall wreath.  This fall is no exception. I have a fabulous wreath to share with you today, and I have a tutorial on how to make the flowers and the leaves for the wreath as well.  I'm also proud to report that I only used supplies from my stash to make this wreath and the form was donated from a friend who was going to toss it in the rubbish bin.  Oh how I love being thrifty ;)

IMG_5500a

To make the Fall Flowers Wreath

Supplies:
Vine style wreath form
Felt in gold, yellow, burnt orange, and green
Hot Glue
Twigs
ribbon for hanging
scissors

This wreath is all about the fall colored flowers.  Once you make the flowers and leaves, the rest of the wreath is pretty much self explanatory.  So I'm going to focus this post on making these rolled felt flowers.  There are a lot of great felt flower tutorials out on the web, and I've pinned lots of them :)  But, I've been irritated that many of them are a bit vague on the details needed to make your felt flowers look their best.

IMG_5485

Rolled Felt Flower Tutorial:

Rolled felt flowers are very easy to make and don't require much precision or any kinds of templates.  They are drop dead simple as long as you follow a few rules.

1. Cut a circle in any size.  The bigger the circle, the bigger the flower.  I generally start with a circle a bit smaller than a dvd disc and use that as my baseline.  Then, I can cut more flowers bigger or smaller depending on my needs.

2. Cut a spiral shape into your circle.  Just start anywhere on the circle and cut an inwards spiral.  If you cut thin spiral arms, your flower will be wide but not tall.  Thicker spiral arms make taller flowers that are not as wide.  Cut loosely without worrying about being perfect.  Avoid jagged cuts that make sharp peaks (if you get a peak, just trim it).  Variation in height makes your flowers look more realistic.

Also, don't cut off the middle part of the circle! You need to leave this attached circle in the middle of your flower.  This will be used later as the flap that seals your flower petals together and keeps them from unrolling down the line.

cut flowers

3.  Now take the outside spiral edge and dab a bit of hot glue about 1/2 inches away from the tip.  You don't want to put the glue right on the tip because it will leak out of the center of your flower and show.  I put it a bit too far away in this photo, but I'm sure you get the general idea.

IMG_5456

4. Begin rolling your flower center from this tip.

IMG_5460

5. Continue rolling your flower.   Don't roll it too tight. Loosen some turns and wobble it slightly.  You want it to have a loose relaxed feel without it falling apart.  Dab a bit of hot glue every few turns in order to keep everything together.

IMG_5447

6.  Once you reach the center.  Put a generous glob of hot glue on the bottom of the flower.

IMG_5467

7. Now, here's where that center flap comes back in.  Fold your center flap down over the bottom of the flower and press it in.  This will lock all your petal layers into place and seal your flower together forever.

IMG_5468

That's it! Super easy and simple right :)  Now, if you've done it right you will have a flower that is loose and interesting.

IMG_5470


You are also going to want to cut a few leaves for this wreath.  I like the addition of a bit of green just to break up all the warm tones from the wood and the flowers.  You can just cut regular leaves and be done with it, or you can add an easy vein to your leaves to make them a bit more interesting.

Making A felt leaf with a vein:

Adding a vein to your leaves is simple.  Make a thin line of hot glue down the center of your rough cut leaf shape. Fold the leaf along the glue line and hold it until the glue sets a bit.  Then, unfold it and while the glue is still a bit warm tug the leaf so it bends back a bit otherwise it will be too straight and stiff from the glue.

IMG_5477

Putting it all together:

Now that your flowers and leaves are all done, you can begin to arrange them on your wreath.  There is no formula for this.  Just start by gluing one flower down and the rest will fall into place. Just relax and trust your own sense of style.

IMG_5442

I personally decided to add a few small twigs here and there in the flower arrangement.  I covered a little more than half the wreath with the flowers.

 IMG_5482

I then took my larger twigs and placed them on the side of the wreath where I didn't glue any flowers.  If you can put a dab of hot glue onto the ends of your twigs before burying them into your wreath form, it will help to hold them in place.

IMG_5493

Finally, add your ribbon so that you can hang your new wreath up and enjoy it all Fall.

IMG_5478a

I hope that you've enjoyed this tutorial and use it to make your own fall flowers wreath.  As always, I'd love to hear about any projects you've made from this tutorial.

How do you get ready for Fall?

Saturday, March 30, 2013

Easter wreath and mini bunting

Can you believe that Easter is almost here already.  I can't!  Have you been having some Easter fun?  We've been dying eggs and visiting some fun Easter markets.  That poor little bread bunny didn't last long.

IMG_3471

I don't feel that I've gotten a whole lot done this week, but holidays are always like that :)  I have managed to tweak my Spring Wreath for an Easter theme by adding a small nest and a cute chalk board inspired mini bunting.

If you remember, my plan is to use this same wreath all spring by adjusting it slightly each month instead of making a whole new wreath. I made up a little mini chalkboard Easter bunting for the wreath that says rejoice.


IMG_3604

I love using mini buntings in different projects.  They are just so cute.  I've used them over cakes and cupcakes, on baskets, and on wreaths.  The whole mini bunting I designed says Rejoice He is Risen.  It would be nice on many different projects and I have it available to download in chalkboard black and green.  Feel free to download either and use them in your Easter Projects.

easter mini bunting image
If you do use the bunting, take a picture and share your project with us :-)  Have a happy Easter.

Tuesday, March 19, 2013

Simple Spring Wreath

Is it that time again already.  Time for a new door wreath.

With everything that has been going on here over the last few weeks, I really haven't had much time to redecorate my door, but I wanted to put something up in time for Easter.  So I dug into my stash and came up with a really simple Spring inspired wreath.

IMG_3152a

Yes, it's very simple, but I decided to only use what I already had, and I think that the colors as so bright and cheerful that it doesn't have to have anything else.  I wish that I had had a yellow and orange ribbon to better match the wreath.  I might break down and see if I can find something that works better if I have the time.  I also think that if I want to change it up a little for April or May that  I might just tweak this wreath a bit rather than make a whole new one.

What do you think?  Could I add little umbrellas to this for April?  Any ideas? :)

Sunday, February 3, 2013

Hugs and Kisses Valentine's Wreath

Yep, it's that time again. Time when I start to feel that our door needs a seasonal update and deserves a new wreath.  Since I absolutely hate our cheap looking faux wood apartment door, I always try accessorize it in the latest seasonal fashions. Plus, my neighbors are disappointed if I don't change the wreath out at the beginning of each month.  Last year at this time, I did a heart shaped crepe flower wreath. This valentines I wanted to do something a bit different. After surfing the web and racking my brain, I came up with a hugs and kisses inspired valentines door hanging.

xo

When I'm designing anything new, I first visualize what I want and then try to figure out how I can make my idea into a reality using easily available supplies.  I like to try to use what I have on hand as much as possible.  I really think that I end up with a more unique and creative item by changing my design to fit my supplies rather than running all over town trying to find supplies to fit my design.  For this wall hanging, I bought the wood letters at my local craft store, but all the other materials were from my stash of yarn and crafty stuff.

xox
I also do a lot of trial and error.  I originally wanted to do the "O" in red yarn, which looked good on the craft table, but it really clashed with the cherry colored door so I had to change it to white.  Then for the arrow, I thought about using a wooden dowel rod for the shaft, but it was too bulky.  I ended up wrapping some wire around a pencil to form the arrow shaft and accented the arrow head with a bit of valentine's garland for some extra bling.  Add a little ribbon to tie the letters together and hang them, and voila, a sweet hugs and kisses wreath just in time for Valentine's.         

Does anyone else like to decorate their doors seasonally?  I'd love to know what you are doing for February.

Monday, December 17, 2012

Christmas Marshmallow Wreath

I had this whole plan for a beautiful and elegant Christmas wreath with oranges and pine cones, but my little son was pinning with me (yep, my 5-year-old loves his Pinterest time with Mommy) and happened to see a marshmallow wreath.  It was all over after that.  So, I did a few experiments to find out the best way to get marshmallows to stick onto a wreath, and I'd like to share the directions that I came up with for anyone who wants to make their own marshmallow wreath without two days of trial and error.

DSCN3121

Before I get to the wreath, I just wanted to share a little Christmas fun with everyone out there.  My family just loves this time of year in Germany.  There are always great markets and fests to go to here, but Christmas is by far the best.  I love visiting all the different markets for the shopping and to see how each is decorated.  Each market has a different theme. Here where I live, it's the Twinkling Star Christmas market. We just went this weekend and my 2-year-old discovered the carousel.  It was a great time. 
  
DSCN3103


Marshmallow Wreath Directions:

Supplies:
Wreath Form (14" for mine)
low heat hot glue gun
2 Bags of regular Marshmallows (stale)
1/2 bag of mini Marshmallows (stale)
White crepe paper or ribbon
1.5 yards of accent ribbon in your choice of color


DSCN3119 copy


Directions:

1. Prep your marshmallows!  Take all your marshmallows and spread them out on a few cookies sheets or some kind of rack for at least 2 days (periodically flip them around so all sides get exposed to the air).  You want your marshmallows to get stale.  Yep, stale.  Fresh marshmallows don't stick well.  I know that you want to do your wreath today, but if you put fresh marshmallow on a wreath, they tend to not stick as well as the stale ones.  It can be done, but I can't guarantee that they wont keep falling off when you close and open your door. *depending on where you are it can take more or less time for marshmallows to get stale*

2. If your form is not white, wrap your wreath in white crepe paper or white ribbon so that the areas that show through aren't noticeable.

3. Using your hot glue (the low temp kind), you don't want your marshmallow to melt here.  If they get too melty, they won't stick.  If they melt a little, just hold them if place while they cool down.  Place your regular marshmallows all over your wreath leaving uneven gaps and spaces.    Don't pack them too tight or space them too far apart.  You want to fill in the spaces with the mini marshmallows to get a nice random look.  I used the whole two bags of normal marshmallows (minus a few that were sampled by the helpers) and about half the bag of minis. 

4. Make a bow with your ribbon leaving two long tails.  Glue bow to top of wreath. Use the rest of your ribbon to hang over the top of the door.  Secure the end with a hook or tape on the opposite side.

That's it.  A bit time consuming but really easy, and it smells great while your doing it :)


Thursday, November 8, 2012

Fall Wreath & an update on past holiday wreaths

Wow, I have to salute all those dedicated bloggers out there who produce quality posts week after week.  It's just too easy to miss a few posts and before you know it, you haven't blogged in weeks or months.  I have been creating fun and pretty things for my family and for others, but I've neglected blogging about them :(  So now, a tiny update on my holiday wreaths.

I love making new wreaths for my apartment's front door.  It's one of the only things that I'm allowed to do to the exterior of my home, so I really enjoy changing them out every month/season.  Here are a few of the wreaths that I've made over the last few months starting from the most recent.

This is my Fall/Thanksgiving wreath.  My family collected tons of acorns for a project last month, and I reused the acorn caps to make this wreath.  I also re-used the Chinese lanterns that were part of a Halloween flower arrangement too.  I love getting two uses out of supplies.

IMG_6776a
      
To make this wreath, I first wrapped the form in garden twine.  Then I hot glued each cap on.  It took hours longer than I anticipated, but I really like the finished product.  I thought about adding a neat olive green ribbon at the top and not putting the lanterns on for a more modern look, but my craft store was sold out of all the nice fall colors so used a scrap of fabric that was in my stash and the color came from the lanterns.

IMG_6782

Last months wreath was for Halloween.  I wanted to make something spooky for the kids.  So I wrapped the form in purple yarn and cut out a haunted house with a graveyard and bats from black paper and accented it with a cheap skeleton from the $1 bin.  I also had to add just a bit of sparkle with the silver ribbon.  It was a big hit with the kids and neighbors.

IMG_6760 copy


The last wreath that I going to share with you today is our back to school wreath made from crayons and paper.  I'm sure that many of you have seen crayon wreaths on Pinterest.  Instead of just choosing the crayons randomly I grouped them by color and then did a gradient pattern around the wreath.  I had the kids color and cut out some school themed coloring pages and my oldest made a kid chain portrait.  We glued it all on for a fun and fab September wreath.  Sorry about the picture quality on the crayon wreath, but in truth the carpet color is no worse than my door color.

IMG_6788 copy

I'm going to try to do some more updates on past projects in the near future and maybe post a few things that I'm working on for the winter holidays.  Wish me luck. :)

Tuesday, July 3, 2012

4th of July Wreath
& wreath form tutorial

Happy 4th of July!!!


4th of july wreath

So today I found myself inspired by the many patriotic wreaths that I've seen on Pinterest lately.  I wanted to make something patriotic and fun for my apartment door to celebrate Independence day, but I didn't have a wreath form or any of the things that easily convert into a wreath form (pool noodle, big tube, pipe insulation).  I tried to buy a wreath form at some of my local stores here in Germany, but everywhere I went they were out of the light cheap kind that I wanted, and there was no way I was dropping 10 Euro on a metal form that didn't suit my needs!  I'm not much into power shopping so I admit to giving up the search after two stores and some subtle hints from the kids that they weren't digging the wreath form hunt.

Then inspiration hit me! I could make my whole project out of stuff I already had.  Actually, I took it as a challenge.  I knew that I had all that I needed, and more, at my own house.  No wreath form; No problem!

So, here is a little tutorial on making a Plastic Bag Wreath Form, and then the patriotic sparkler wreath.

Plastic Bag Wreath Form Tutorial

form

What you need for the wreath form:

Plastic grocery bags (any supermarket style bag will do.  You know that you have a ton of these stashed somewhere :)
Wire Coat Hanger
Tape
Pliers or strong fingers  

1. Bend your hanger into a circle shape.  It doesn't need to be perfect, but get it as round as you can.  Then, bend the hook over to form a loop.  This makes a nice hanger at the back of the wreath when you're done.

1

2. Grab your shopping bag by the bottom and tape the end around the hanger.  Then, begin to twist the bag around the hanger.  You don't want to do it too loose or too tight.  Once the whole bag is twisted around the hanger, tape the end to the hanger.

2

3. Continue adding bags around the hanger.  Slightly overlap the ends when adding a new bag.  Tape at the ends and at spots that don't want to behave as you go.  Continue adding layers around until it reaches the thickness you desire.

3

4. When you reach the loop you made from the hanger hook weave the bags through it for the first few layers so that you can get your finger through it. If you continue to add layers, like I did, just go around the loop without covering it too much.

4

5. You should end up with the nice sturdy wreath form. If at this point you think it's not quite round, don't be afraid to tug it into shape or add a bag in a spot that is not quite thick enough.

5

You can see in the last photo that I've already started to add my crepe paper to the wreath.
To make this 4th of July wreath (or your own variation) continue on.

Supplies:
Wreath Form
Crepe paper party streamers in Red, White, and Blue (1 roll each)
Stiff Paper for the stars
White Glitter (or Sugar) *optional*
Glittery ribbon in silver and gold (mine is the kind used for wrapping presents)
Wood Skewers
Black paint and White paint 
Blue and red ribbon (or whatever you have) to make a bow
hot glue

You are going to cover your wreath using little crepe paper florets for this project.  It's cheap and its easy.  I found it was easier to make a whole big pile of each color and then glue them to the form, but you can make the florets as you go.

1. Make the florets by cutting two pieces of crepe paper and crossing them over the top of each other (1). Don't make the pieces too long or they will stick up too much.  They should only be cut a bit longer than they are wide.  Pinch the center (2), and then twist them together (3) to form a little point at the bottom (4).  It's that easy.

6


2. Glue the florets onto the form in a flag style pattern as seen in the photo.

7
 
3. Cut your star shapes from some stiff paper. Paint them with white glue or white paint and shake on some glitter for sparkle. I didn't have any glitter so I used sugar instead. It worked great and my four-year-old thought it was super cool. Glue them to the blue field on your wreath.

8

4. To make the sparklers, paint the wood skewers black and then cut your sparkle ribbon into about 3.5 inch pieces. fold them in half and glue them to the tip of the skewer. I just had mine going every-which-way so they would resemble real sparklers. Then glue them to the wreath at a few points along the stick and where they cross each other.

9

5. Make a bow with your blue and red ribbon and glue it over the sparklers where they cross. This gives it a nice finished look. Then just hang your wreath and enjoy your holiday.

10


 Now go out and have a BBQ and enjoy the fireworks while you celebrate the freedom that we are so fortunate to have.
Related Posts Plugin for WordPress, Blogger...